Snapshots
Now that we have users, File Groups and Filesystems we are now going to discuss Snapshots and Snapshot Policy and how they can be used.
Goals for this module
The following items are going to be discussed in this module:
- Snapshot use cases
- Snapshot Actions
Snapshots
Snapshot use cases
Snapshots enable the saving of a filesystem state to a directory and can be used for backup, archiving and testing purposes. Snapshots allow the saving of a filesystem state to a hidden .snapshots directory under the root filesystem. They can be used for:
- Physical backup: The snapshots directory can be copied into a different storage system, possibly on another site, using either the WEKA system Snap-To-Object feature or third-party software.
- Logical backup: Periodic snapshots enable filesystem restoration to a previous state if logical data corruption occurs.
- Archive: Periodic snapshots enable accessing a previous filesystem state for compliance or other needs.
- DevOps environments: Writable snapshots enable the execution of software tests on copies of the data.
Snapshots do not impact system performance and can be taken for each filesystem while applications run. They consume minimal space, according to the differences between the filesystem and the snapshots, or between the snapshots, in 4K granularity.
By default, snapshots are read-only, and any attempt to change the content of a read-only snapshot returns an error message.
Tip
More detailed information on snapshots can be found at WEKA Docs
Snapshot Actions
Actions are:
- Creation
- Restore
- Duplication
- Delete
We will cover all of these tasks and run them in the UI AND CLI accordingly. To make sure we can see the results of the actions we are going to mimic a POSIX client connection via the cluster itself.
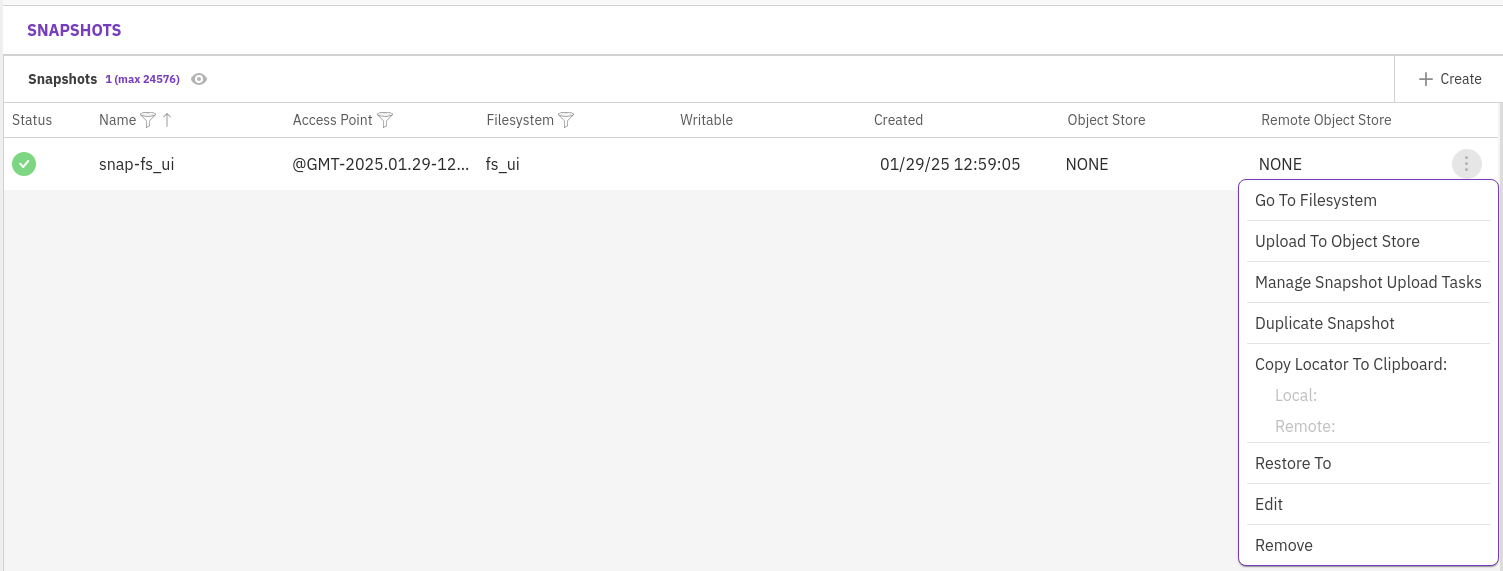
Snapshot Create (UI)
-
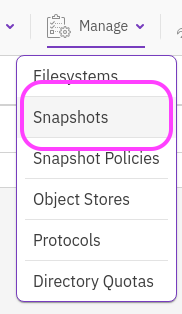
In the Chromium browser, navigate to Manage > Snapshots
-
Click on the far right side of the screen, you may have to scroll to it, + Create
-
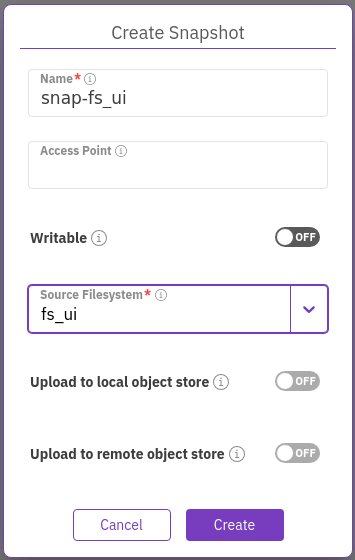
Use the following parameters for the Snapshot:
- Name: snap-fs_ui
- Access Point: Leave default *1
- Writable: Leave default *2
- Source Filesystem: fs_ui
- Upload to local object store: Off (Unable to change as we haven't defined an Object Store)
- Upload to remote object store: Off (Unable to change as we haven't defined an Object Store)
-
Click Create to have the snapshot created. After a few seconds (a popup message appeared at the bottom of the screen) the snapshot will be shown

Snapshot Restore - Full Filesystem (UI)
Now that we have the snapshot let's do something crazy.
- SSH back into the client as the paas user (
ssh -s .ssh/paas paas@<IP_ADDRESS_OF_YOUR_CLUSTER>) -
Run the following command to remove all created 1000 files of 1MB you created earlier and as proof show the content using the
lscommandrm -Rf /mnt/wekafs/data/test* ls /mnt/wekafs/data/ -
After the prompt returned, open the Dashboard by clicking on the WEKA logo in the top left corner.
-
In the Capacity "widget" see that the used capacity is 1.1 GB. But all files have been removed the above
lscommand showed total 0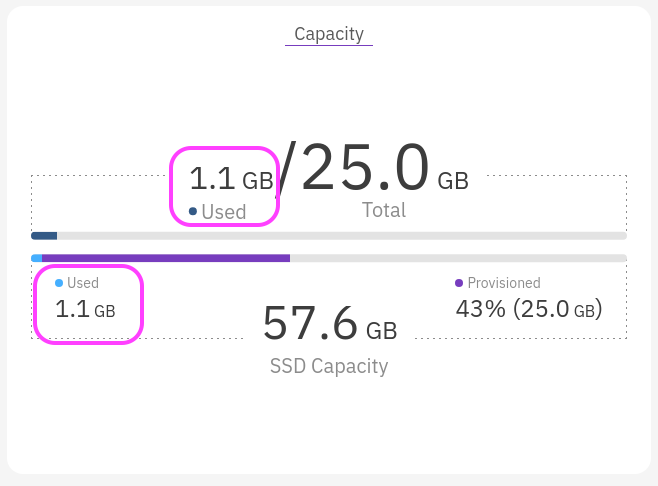
Note
"Snapshots consume minimal space, according to the differences between the filesystem and the snapshots, or between the snapshots, in 4K granularity." So the cluster is now using 1.1GB of storage as changes due to the deletion of the 1000 files.
When you created the filesystem it was only a few KB (the screenshot in step 4)
-
In the browser, navigate back to Manage > Snapshots and click the three dots at the far right of the line that shows the snapshot snap-fs_ui
-
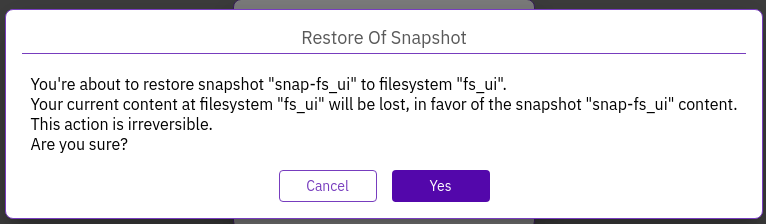
Select Restore To and click Save*3 to have the date restored to fs_ui
-
Accept the warning as that is exactly what we want
-
When the action is done, return to the SSH session and run
ls /mnt/wekafs/data/and see that the files have returned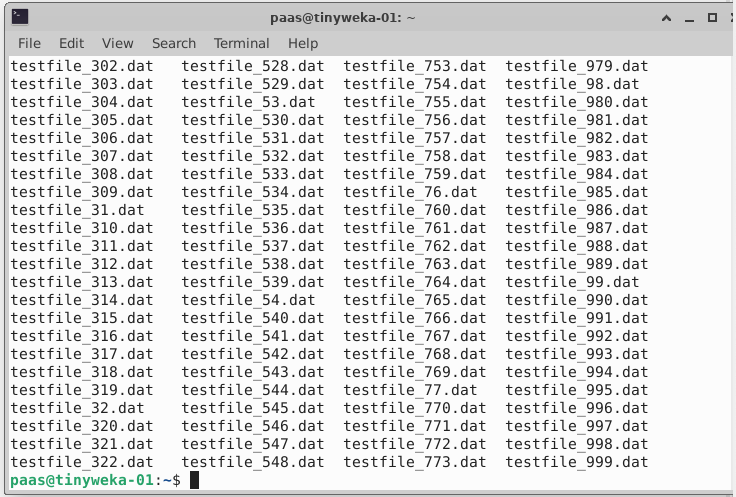
Now let's be more selective of the information you might want to restore.
Snapshot Restore - Some files
-
Rerun the commands to remove all files again:
bash rm -Rf /mnt/wekafs/data/test* ls /mnt/wekafs/data/ -
Run the following command to restore some files (testfile{1..20}.*):
cp /mnt/wekafs/.snapshots/@GMT-*/data/testfile_1{1..9}.* /mnt/wekafs/data ls /mnt/wekafs/data/ -
The above command should JUST have copied 20 files back into the /mnt/wekafs/data mount point, which is shown by the
lscommand to proof.
Snapshot Duplicate (UI)
What if you want to test with production data, but you're not willing to impact the business and make changes to the data? How can you use snapshots? Well there are a few possibilities:
- Using a separate cluster where the Filesystem is "synchronized" to a S3 bucket and then "imported" into the other cluster*4. This will require two clusters.
- Use the snapshot of the Data in a read/write mode, the snapshot will NOT be manipulated as it is a RO, but may impact the production cluster as it will consume extra overhead in the way it needs to redirect all changes.
- Duplicate a snapshot to another snapshot. This is still a snapshot and may have some impact on the originating cluster, BUT the data is completely separated from the production data. It saves having a second cluster, and possibility of impact on the production data's snapshot.
Readonly Snapshots
-
Try to run the following command against the snapshot we created earlier and restored data from and see that an error is thrown when trying to run
touch(write a file) command:echo "Hello this is a write action" > /mnt/wekafs/.snapshot/@GMT*/data/test_file.txt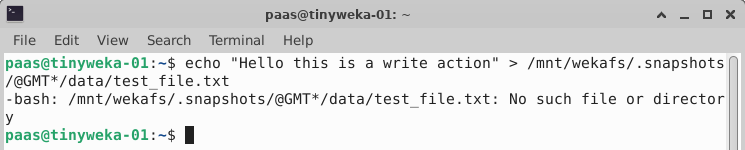
-
When running
echo "Hello this is a write action" > /mnt/wekafs/data/test_file.txtis working as expected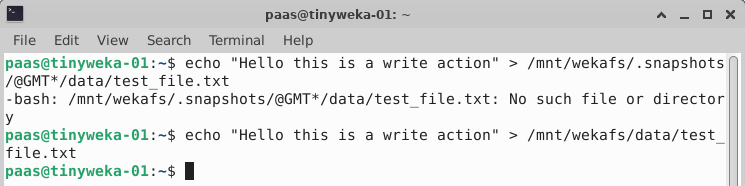
Now remember that when we create the snapshot we didn't toggle the WRITABLE switch!
Let's fix that. We want to have a snapshot of production data, BUT it must be writable as we need to make changes to the files which are being used in retraining of a test environment, but the data as to be manipulated first.
Writable Snapshots (UI)
-
Navigate to Manage > Snapshots and click the three dots again, and select now Duplicate Snapshot
-
Use the following parameters for the Duplicate:
- Name: snap-dup-fs_ui
- Access Point: snap-dup-fs_ui
- Writable: On
- Rest leave as default
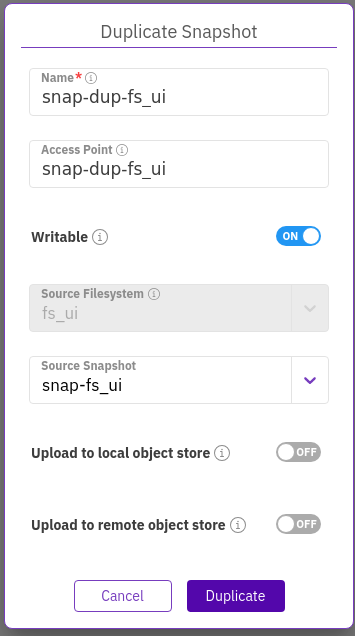
-
Click Duplicate
-
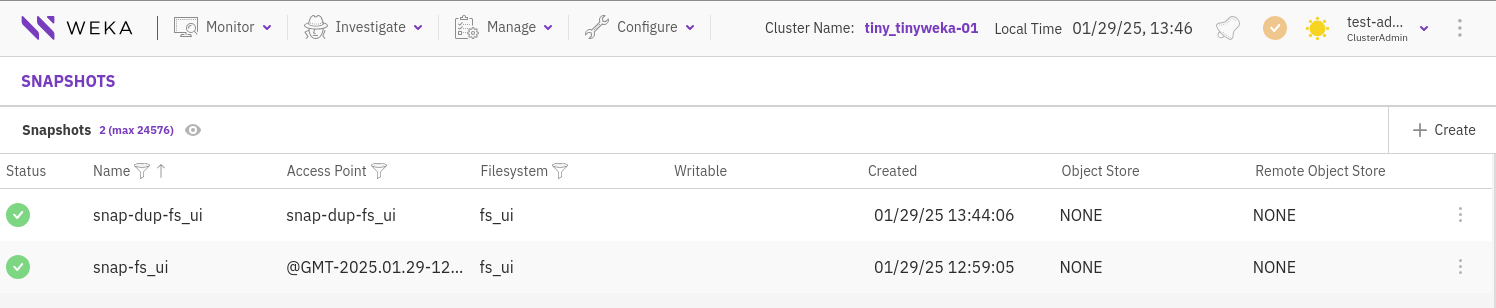
The new snapshot is shown in the snapshots that are available in the cluster
-
Now rerun the below command and see that the write happened as no error messages have been thrown:
echo "Hello this is a write action" > /mnt/wekafs/.snapshots/snap-dup-fs_ui/data/test_file.txt cat /mnt/wekafs/.snapshots/snap-dup-fs_ui/data/test_file.txt -
Now let's pretend we need to have make a change to testfile_1 till testfile_19. Use the following command to change the file content:
# Showing the current content of the files (empty files no output)
for i in {1..9};do cat /mnt/wekafs/.snapshots/snap-dup-fs_ui/data/testfile_1$i.dat;done

# Change the content of the files
for i in {1..9};do echo "Hello from ETL" > /mnt/wekafs/.snapshots/snap-dup-fs_ui/data/testfile_1$i.dat;done

# Showing the new content of the files
for i in {1..9};do cat /mnt/wekafs/.snapshots/snap-dup-fs_ui/data/testfile_1$i.dat;done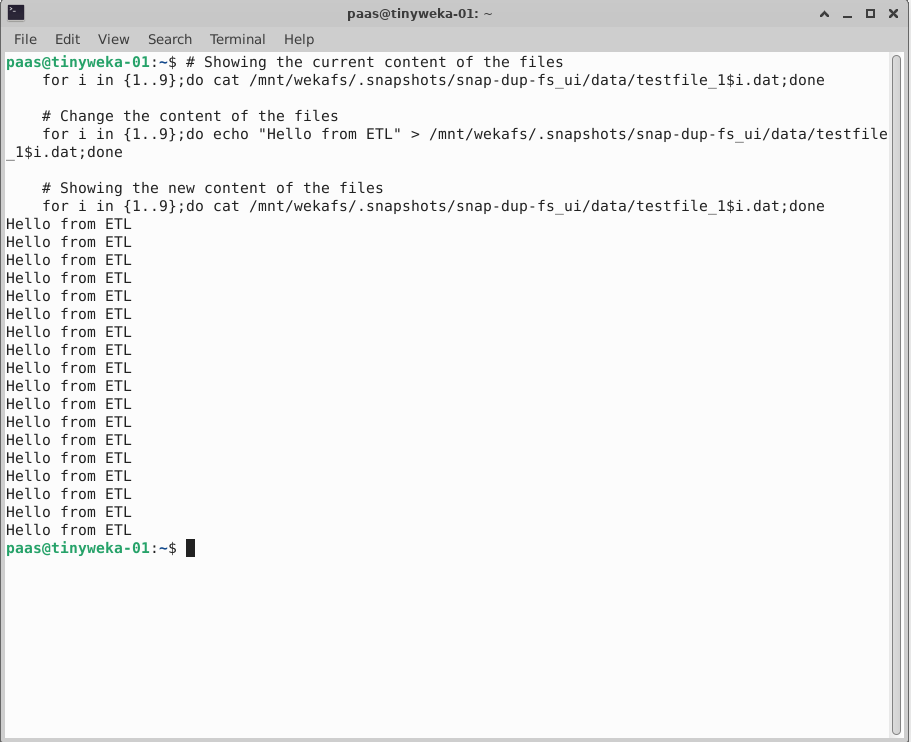
-
If you run the command against the primary snapshot of the fs_ui, you will see that it hasn't overwritten the data in the snapshot
for i in {1..9};do cat /mnt/wekafs/.snapshots/@GMT*/data/testfile_1$i.dat;done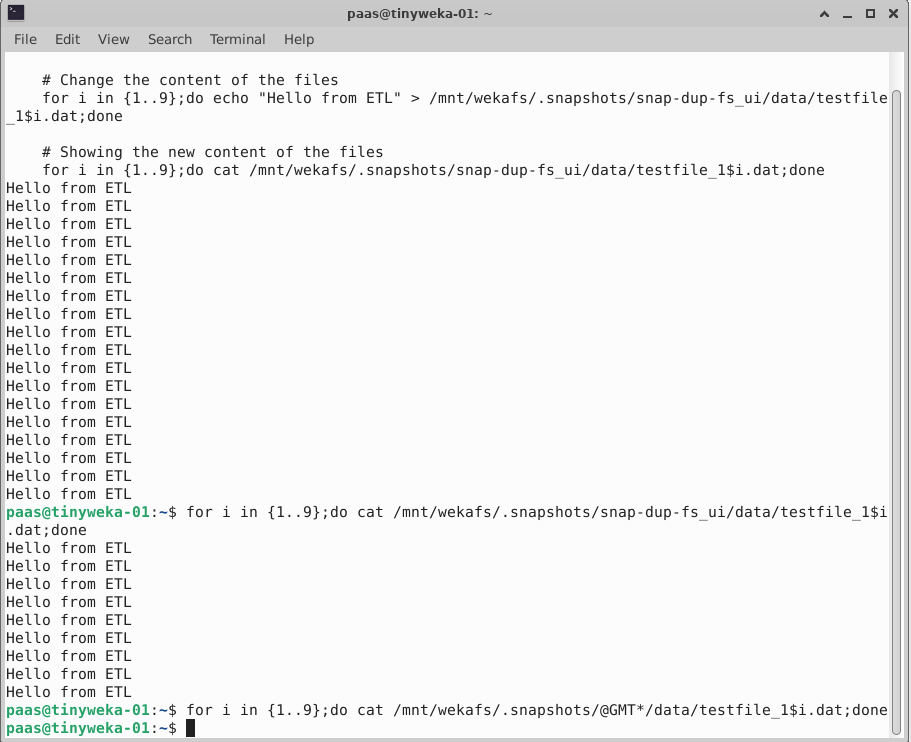
Let's assume you wanted to go back to the starting point when you had the duplicate and undo the changes you made. Just remove the duplicated snapshot and recreate the duplicate. Done.... And the best part? It can be scripted using API or the CLI....
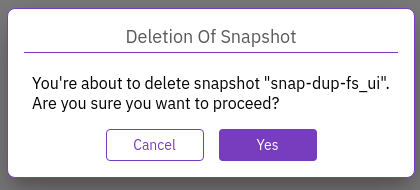
Delete a Snapshot (UI)
Deleting the snapshot is very simple. Just click the three dots at the far right side of the snapshot and click Remove
Accept the Deletion of the Snapshot by clicking Yes and the snapshots is removed from the system. That's it....
Recreating all steps above using CLI
Now let's see how we can use a script to recreate the same steps from the UI, but now using the CLI for the fs_cli Filesystem
Create snapshot (CLI)
- Open a new SSH session by navigating in your Terminal Emulator to File > New Window
- Login to the cluster using
ssh -i .ssh/paas paas@<IP_ADDRESS_OF_YOUR_CLIENT> - Run
weka user loginand use the test-admin account to login with the set password -
Run below commands
# Create a new mount point for the fs_cli Filesystem sudo mkdir /mnt/wekafs-cli # Mount the fs_cli to the created mount point and set the permissions so all users can read and write sudo weka mount fs_cli /mnt/wekafs-cli sudo mkdir /mnt/wekafs-cli/data sudo chmod 777 /mnt/wekafs-cli/data # Create 1000 1M files in the newly mounted Filesystem for i in {1..1000};do dd if=/dev/zero of=/mnt/wekafs-cli/data/testfile_$i.dat bs=1M count=1 status=none; done # Create a R/O snapshot of the fs_cli Filesystem weka fs snapshot add fs_cli snap-fs_cli -
Your data is now available in /mnt/wekafs-cli/data for the "production" environment and the snapshot /mnt/wekafs-cli/.snapshots/@GMT*/data
- Remove all the created files in by using the command
rm -Rf /mnt/wekafs-cli/data/*and check that there re no files by usingls /mnt/wekafs-cli/data/and see that all are gone.
Snapshot Restore - Full Filesystem (CLI)
-
Run the following command to have the full Filesystem restored
weka fs restore fs_cli snap-fs_cliNote
This command needs a user to interact (yes/no) when this is not what you want, a script is running and no user is capable to type the answer, use the -f parameter in the command
weka fs restore fs_cli snap-fs_cli -f -
Run the command
ls /mnt/wekafs-cli/data/and see that all files have returned - Use
rm -Rf /mnt/wekafs-cli/data/*to clean out all files again
Snapshot Duplicate (CLI)
-
Run the following command to have a duplicate of the existing snap-fs_cli snapshot
weka fs snapshot add fs_cli snap-dup-fs_cli --access-point snap-dup-fs_cli --source-snapshot snap-fs_cli --is-writable
Note
As you can see from the command, there is no "duplicate" action on the CLI as there is on the UI. The "trick" is to use the parameter
--source-snapshot. So this can scripted and maybe run every start of a new day in the evening so the next day there is the latest set of data available. -
To emulate the same changes as we ran earlier in the UI, you can run the below commands to show you can write to the duplicated snapshot
# Showing the current content of the files (empty files no output)
for i in {1..9};do cat /mnt/wekafs-cli/.snapshots/snap-dup-fs_cli/data/testfile_1$i.dat;done

# Change the content of the files
for i in {1..9};do echo "Hello from ETL" > /mnt/wekafs-cli/.snapshots/snap-dup-fs_cli/data/testfile_1$i.dat;done

# Showing the new content of the files
for i in {1..9};do cat /mnt/wekafs-cli/.snapshots/snap-dup-fs_cli/data/testfile_1$i.dat;done
Delete a Snapshot (CLI)
Let's remove the snapshots that we have created earlier, including the one which is still there from the UI part.
-
Run the following command to remove all snapshots
weka fs snapshot delete fs_cli snap-dup-fs_cli -f
weka fs snapshot delete fs_cli snap-fs_cli -f
weka fs snapshot delete fs_ui snap-fs_ui -f
Remark
The -f parameter is bypassing the yes/no question. It will force the deletion. All CLI information on SnapShots can be found at WEKA Docs
-
As we are done for now with the Backend server and the mounting of volumes, let unmount them. Run these two commands:
sudo weka umount /mnt/wekafs
sudo weka umount /mnt/wekafs-cli
Footnotes
*1 A name of the newly-created directory for filesystem-level snapshots that serves as the snapshot's access point. If you do not specify the access point, the system sets it automatically (in GMT format)
*2 Determines whether to set the snapshot to be writable.
*3 As there is no other available snapshot, the option to restore to a snapshot is grayed out. Try it yourself, create a new snapshot and then try to restore a snapshot to the newly created snapshot. You will see that it works.
*4 This describes the Snap-To-Object process which will be discussed later in the lab